(Update 01/2019– I have posted a review of the new Nook tablet 10.1, if anyone is interested.)
Synopsis: This is a quick guide on how to install Android 7 (‘Nougat’) on a Barnes and Noble Nook HD+ device. (If you want to upgrade a Nook HD instead, please look at my other blog post, here.)
You don’t need to be a full-fledged hacker to do this upgrade, not at all, and if you have 30 minutes to spare you can breathe new life into your tablet. Read on to learn how.
Do you have a Barnes and Noble Nook HD+ and are wondering what to do now that B&N has essentially abandoned support for it?
It’s a pity– the HD+ is one of the great values out there, dirt cheap on eBay and with a hi-res 1920×1080 screen display, it’s great for eBooks and videos.
The trouble is, the OS on the device is a customized version of Android 4.0, several years old and which is rapidly being phased out. If you go to the Google Play store on the Nook you’ll find more and more apps that claim they’re ‘not supported’ on the device.
That’s not because the hardware is obsolete. The Nook HD+ has a dual core chip and that excellent HD display. It may not have all the bells and whistles as the latest Android tablets but it has plenty of horsepower to run most apps. So if you have one laying around, what to do?
It turns out you can upgrade the Nook to the latest (as of February 2017) Android OS, version 7.1 (‘Nougat’). To do this you’ll need a microSD card, at least 1 GB in size, and a card reader that lets you read/write to it from a PC. These items are very inexpensive these days.
There’s a very active community that makes current custom ‘images’ of Android that run on a variety of devices. Luckily, the Nook HD+ is one of them. It so happens that Android is an open-source platform, which means Google releases the source code for anyone to modify. Some enterprising folks have therefore ported the code to the Nook HD and HD+. If you see the term ‘cyanogenmod’ bandied around, that’s one group that ports Android to various devices.
This blog post is for people who want to move their Nook HD+ device to Android 7 quickly and with as little fuss as possible. In a couple of paragraphs I’ll show you how to do this, but I’d be remiss if I didn’t first mention a couple of resources that helped me.
There are terrific resources out there on installing Android on a Nook HD+, though it can be hard to find everything in one place. Let me post the most user-friendly one, here:
Installing Android 5.1 on a Nook HD+
It’s what got me started and is a wonderful resource, though as the title indicates, it’s for Android 5.1 and not 7.
Another resource you might enjoy is a comprehensive beginner’s pdf attached to this post that discusses how to install Android 5.1 ( ‘cyanogenmod 12.1’ in the community lingo) on the Nook. It was written by some retired guys who wanted to juice up their old Nook devices and is very beginner-friendly.
Ok, enough of the background and history, let’s get to business. For those of you who want a streamlined version of how to go to Android 7, start by downloading three files from my dropbox folder. They’re curated from various Android forums, and are:
- cm_ovation-ota-NMF26Q.161222.zip— this is Android 7.1, in a zip format, courtesy of a gentleman named Andrei Măceș, someone very active and respected in this sphere.
- emmc-cwm-early3.1.img.gz — this is a ‘bootloader’, something that lets you get the whole process started. You unzip this, install/flash it on a microSD card and put it in your Nook HD+ and boot from it to get the installation going. We’ll go over how to do all this.
- open_gapps-arm-7.1-pico-20170203.zip— this is a package that contains the Google Play Store for Android 7. With Google Play on the device you can install all sorts of 3rd party apps (Netflix, etc.) Google Play is your gateway to the full Android ecosystem.
Be aware that these files total 350 megabytes combined, so downloading them will take a few minutes on a good internet connection. (Just to underline, the files above are for the 9″ Nook HD+. For the 7″ Nook HD read my companion blog post here.)
Using these three files and the steps below, you can upgrade your Nook HD+ to Android 7.
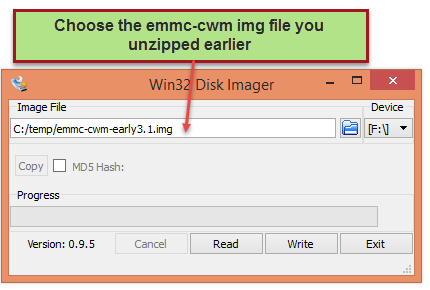
Start by unzipping emmc-cwm-early3.1.img.gz to a temporary folder on your hard drive with any unzip program you like, 7-Zip or WinRar or take your pick. Note that the file extracts from 7.5 MB to a ‘img’ file 900 MB in size– that’s some serious compression, so make sure you have room on your hard drive.
What is this 900 MB file that came out of the zip? It’s the bootloader we’re going to use to start the Android tablet with and get the ball rolling.
With the img file unzipped, you’ll need to write it to a microSD card. (Again, you can buy these cards and USB adapters for them to plug into your PC very cheaply these days.)
The way I wrote the img file to the card, and the way discussed in the tutorial I linked to above, is to use a free program called win32 disk imager. This will wipe the microSD card and extract the img file to it in such a way that you can boot from the card. (If you don’t use Windows, Mac and Linux software is out there that does the same thing.)
Install win32 disk imager on your PC and fire it up and you’ll see a dialog. Choose the img file you just unzipped and make sure you write it to your microSD card, and _not_ one of your hard drives.
Hit the ‘Write’ button and it’ll take a minute or two to extract the image to your microSD card. Keep in mind this will wipe out anything on the card, so make sure you don’t have any files on there you need, and once again make sure the drive letter (F:\ in my example) is that of your SD card, and not a hard drive!
When the image file is written to your microSD card you can simply copy the other two zip files (cm_ovation-ota-NMF26Q.161222.zip and open_gapps-arm-7.1-pico-20170203.zip ) to it, simply drag and drop them to the root directory with all the other extracted files.
Once you’ve extracted the bootloader and copied both zip files to the microSD card you’re ready to install Android 7 on the Nook.
Before you start, make sure your Nook is fully charged, as the Android 7 installation can take 30 minutes or so and running out of power halfway through isn’t much fun. You’ll also want to save any ebooks, videos or other files you want from the Nook to a safe location before starting, as the procedure we’re using here is a fresh start, clear-the-decks installation that will wipe out any data you have on the device.
Once the device has a full battery, turn it off, insert your microSD card and turn it on. You should see a ‘cyanoboot’ splash screen, which means the bootloader is doing its thing:
![WP_20160803_10_48_17_Pro[1]](https://nookhdplusandroid7.files.wordpress.com/2016/08/wp_20160803_10_48_17_pro1.jpg?w=340&h=604)
I’ll note here that sometimes you may need to reboot the device two or three times in order for it to boot from the microSD card, so if you go straight to the old Nook interface, same as ever, just shut the device down and try again. Eventually you should hit the cyanoboot screen.
(If you’re really having trouble booting from the microSD card, believe it or not you might try your luck with a different one– Nooks can be *very* picky about the cards they’ll boot from. Try an older card, perhaps a class 4 vs class 10 one. It sounds ridiculous but others have had success going this way. A 4 or 8 GB microSD card is only about $8.00 shipped from ebay, so no harm trying.)
Once the splash screen fades you’ll be presented with a boot menu and options similar to the below.
![WP_20160803_10_53_00_Pro[1]](https://nookhdplusandroid7.files.wordpress.com/2016/08/wp_20160803_10_53_00_pro1.jpg?w=643&h=1140)
The way to navigate around the menu is to:
- Use the volume buttons to move up and down,
- Use the Nook home button to select the currently highlighted choice
- Press the power button to go up one menu
The first step is to wipe the device and start fresh. Again, that means copying any files you want off the Nook to a safe place beforehand and choosing the ‘wipe data / factory reset‘ option. Wiping the device will take a moment and you’ll see some progress text at the bottom of the screen as it goes through it.
(Note: the tutorial I linked to above discusses various recovery options and other halfway measures that allow you to upgrade your Nook in-place rather than wipe the data and start fresh. By all means explore that option if you like, but for me it’s easier to get a clean slate and the general consensus is that it’s the simplest way forward.)
Assuming you’ve wiped the data and done the factory reset, you’ll want to restart the tablet by going up to the root menu and selecting “reboot system now“. (If, after selecting the reboot option you’re asked any questions or warnings about ‘root’, just say no to them and get the reboot going.)
When the device reboots you’ll return to the root menu. This time, choose the ‘install zip‘ option and from there choose the external_sd folder. In there, you’ll want to install the cm_ovation-ota-NMF.161222 zip file:
![WP_20160803_10_54_28_Pro[1]](https://nookhdplusandroid7.files.wordpress.com/2016/08/wp_20160803_10_54_28_pro1.jpg?w=542&h=962)
Give that a minute or two, then return to the same menu area and this time choose to install the open_gapps-arm-7.1-pico-20170203 zip file. This will install Google Play on the device.
With that done, go ahead and reboot the device, this time with the microSD card removed. (As with the first time you rebooted, you may be asked a question at this point about ‘root’ needing repair– this is because we’ve removed the SD card. Go ahead and say ‘no’ to this, if the question appears. It’s not a big deal either way, just an artifact of our having removed the card.)
The initial boot sequence may take ~10 minutes the first time through as it calibrates in the background, so get a cup of coffee at this point.
You may have to power down and reboot one or twice to get things moving– this is not unheard of, so don’t worry if the procedure seems a little slapdash.
When all is said and done, after 10 minutes and/or a reboot or two you should be in good shape and looking at an Android 7.1 device, with Google Play installed, and you’ll be ready to go.
Update 6/2017– apparently Netflix is now blocking any rooted android tablet from downloading their app from the Google Play store, because of location-specific content restrictions, which is annoying. However, you can still install Netflix on the tablet easily enough, as discussed in this article among many.
This also applies to the Barnes and Noble reader app, which is also ‘blocked’ on the Google Play store from any device / OS combo they don’t approve of. The way to get around that is to go to a site such as apkpure.com and look up the Nook reader, download the apk file and install it via Chrome.
